
Hi all,
If you are installing Windows Server Core 2012 there is a quick and easy way to configure you server using sconfig.cmd. In this blog I will be going cover configuring the following settings in Windows 2012 Server Core.
Configure Network Settings
Renaming the server
Joining a Domain
Adding a user to the local administrators group
Configuring and running Windows Updates
Enabling Remote Desktop
Setting the Date and Time
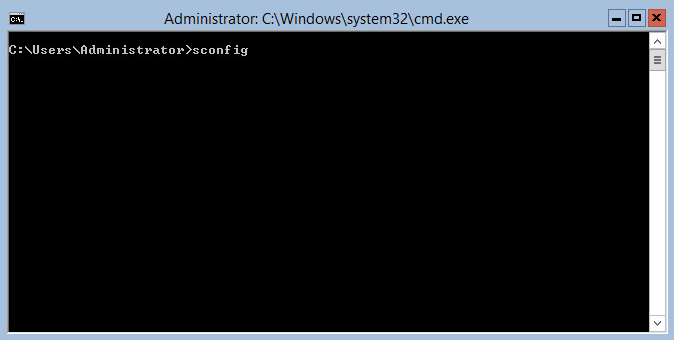
Logon to the server as local Administrator, and type sconfig at the command prompt and press enter as shown below.
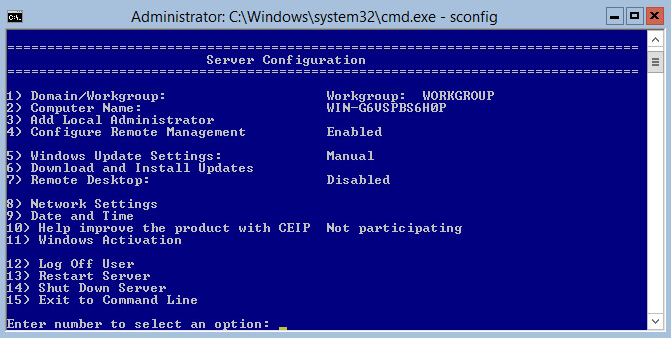
Now you will see the sconfig utility opens to the “Server Configuration” screen with a menu of configuration options.
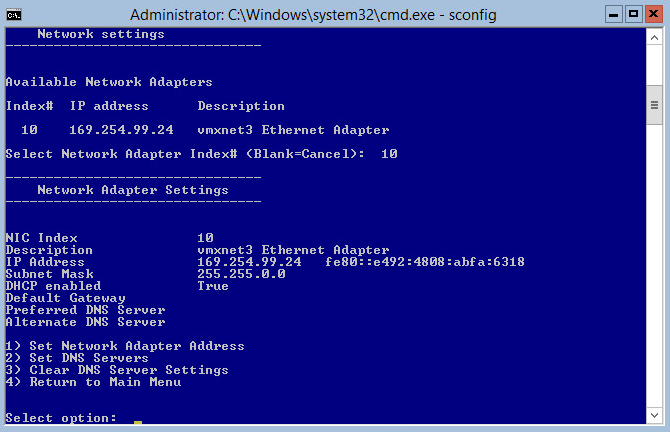
To start, I’m going to configure the network settings so we can complete all the other task which are mostly dependent on network connectivity. Select option 8 and press enter and you will be brought to the “Network Adapter Settings” screen. Choose a network adapter to configure by entering the index number. In this example the index number is 10.
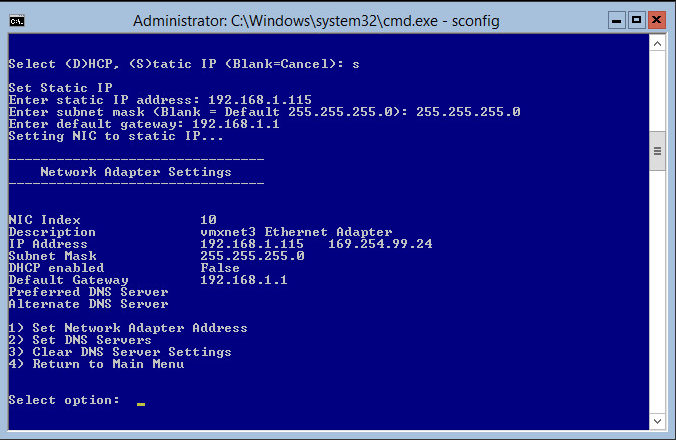
Select option 1 to configure the network address. You will then be asked to configure the following options as shown in the illustration below.
Select either DHCP or a Static address.
Enter an IP address
Enter a subnet mask
Enter a Default Gateway
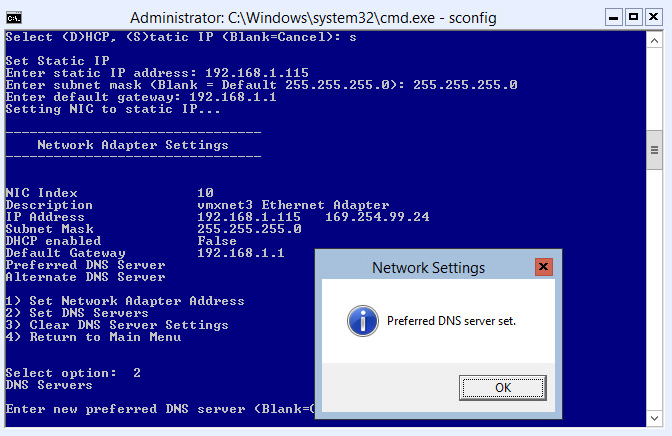
Once you’ve entered in all the information the NIC will be set to the new address as shown below.
To configure a DNS server select option 2 on the “Network Adapter Settings” screen. Enter the DNS Server’s IP address and press enter. You will receive confirmation that the preferred DNS server address has been set as shown below. Click “OK” on the confirmation.
You will then be prompted to enter a secondary DNS server. Type an address or just press enter if you don’t want an alternate DNS server configured.
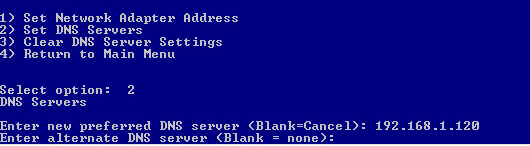
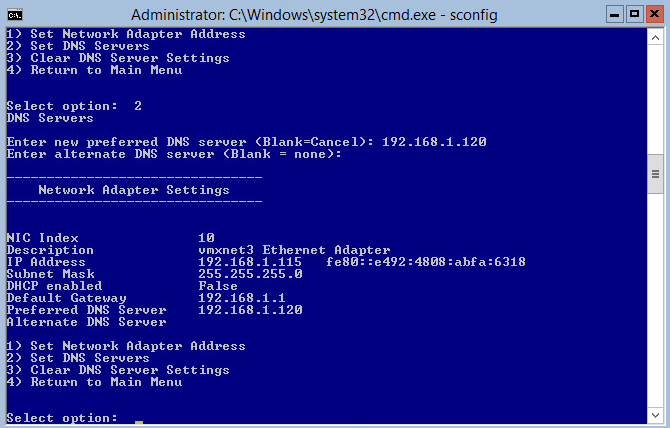
I’m going to press enter and skip putting a secondary DNS server. You will now see all your network settings are configured as shown below.
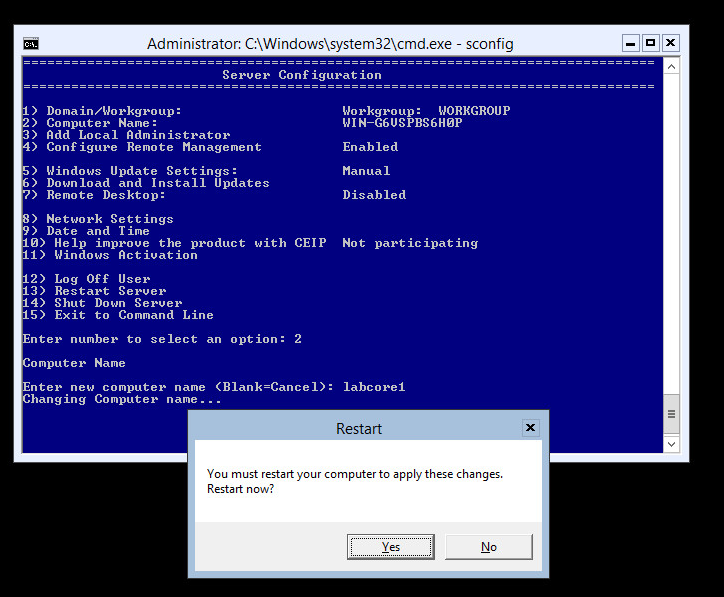
Select option 4 to return to the “Server Configuration” screen. Now let’s rename the server. Press option 2 for “Computer Name”. Enter in a computer name (in this example the computer name is LABCORE1) and press enter. You will be prompted to restart as shown below. Click “Yes” to restart.
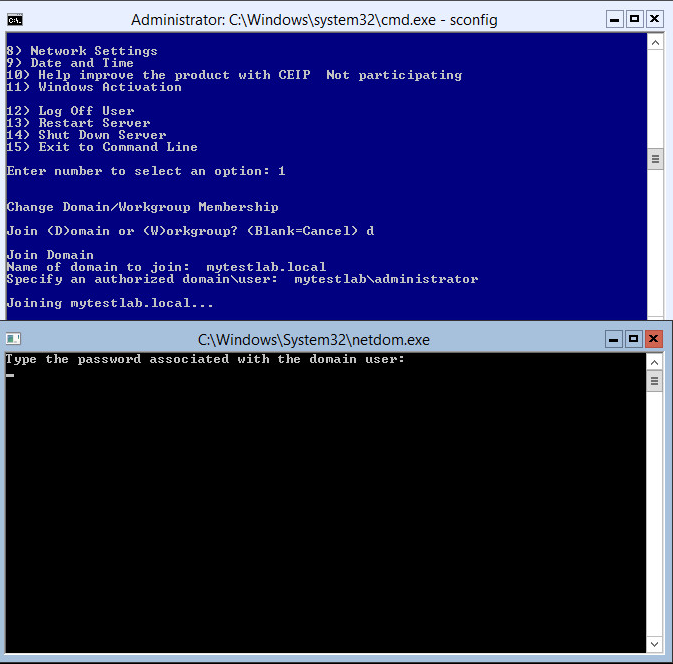
After the reboot, logon to the server and open sconfig. Now let’s join the computer to a Domain. Select option 1 for “Domain/WorkGroup”. Enter the letter “D” to choose “Domain”. Now you will be asked for the name of the Domain you would like to join (in this example we are using (mytestlab.local). Next you will be asked for an authorized account to join the machine to the Domain. Enter in the user name (in this example its (mytestlab\administrator). A second screen will open asking you for the authorized user’s password as shown below. Type the password and press enter.
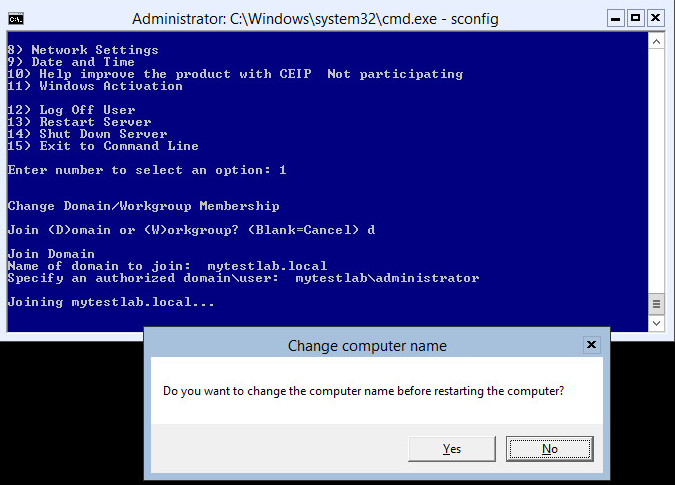
Now you will be prompted with the option of renaming the computer before you restart. I’m going to select “No” as this has already was completed earlier for demonstration purposes.
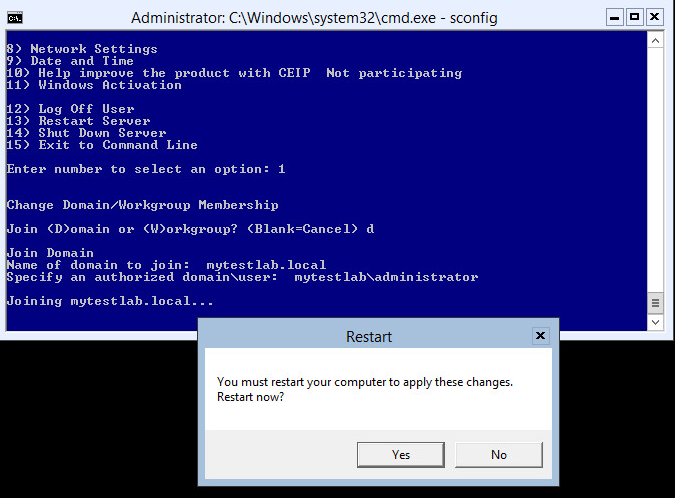
When prompted, click “Yes” to restart the server as shown below.
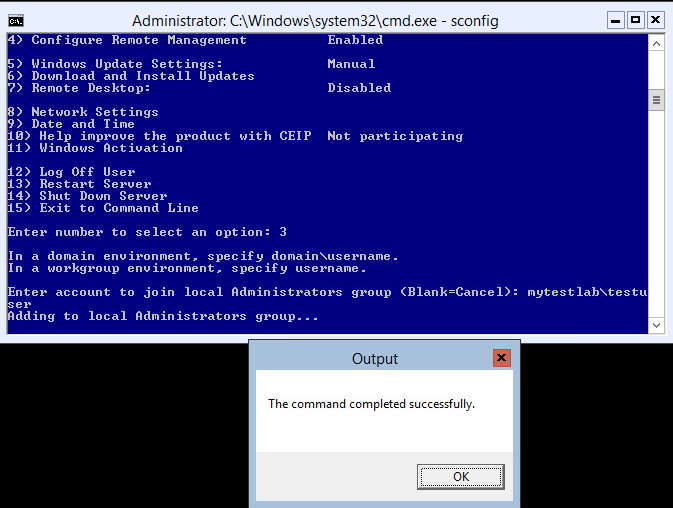
Next we will add a Domain account to the local administrators group. Select option 3 for “Add Local Administrator”. Now enter in the Domain\Username as shown below (in this example we added a user named “Testuser from the Domain “myteslab”). You will receive confirmation that the command completed successfully. Click “OK”.
Now let’s configure Windows Updates. Select option 5 for “Windows Updates Settings” Since the default is set to manual, for the purpose of this example we will select “A” for automatic as shown in the illustration below. You will then receive confirmation that Automatic Updates has been turned on and will check for updates everyday at 3 AM. Click “OK’ to the confirmation prompt to return to the “Server Configuration” screen.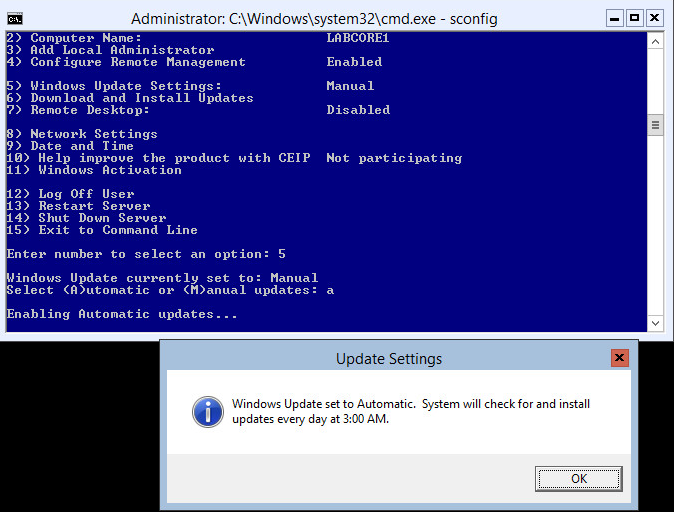
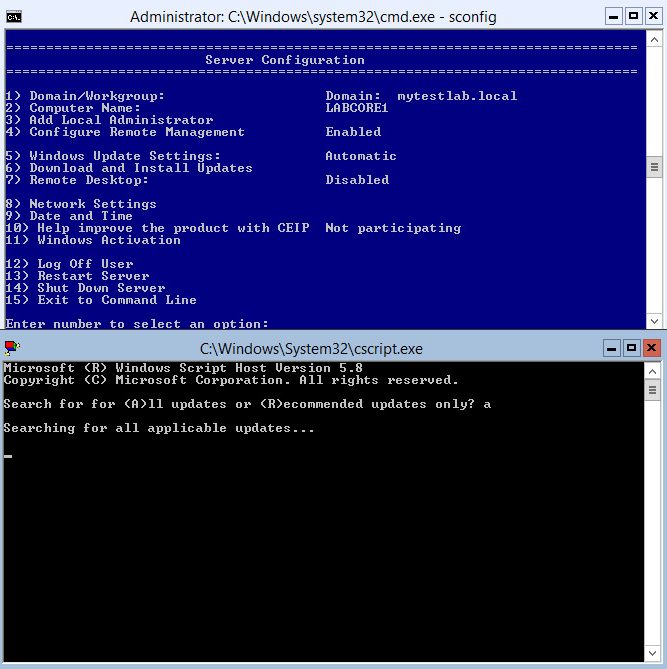
Since this a new server, we want to manually download and install all Windows Updates at this time since we don’t want to have an unpatched server on our network. To do this, select option “6” for “Download and Install Updates”. Once you choose option 6 a new window will open and ask to search for all updates or recommended updates. We will choose “A” for all updates as shown below. Windows Update will now start searching for all applicable updates.
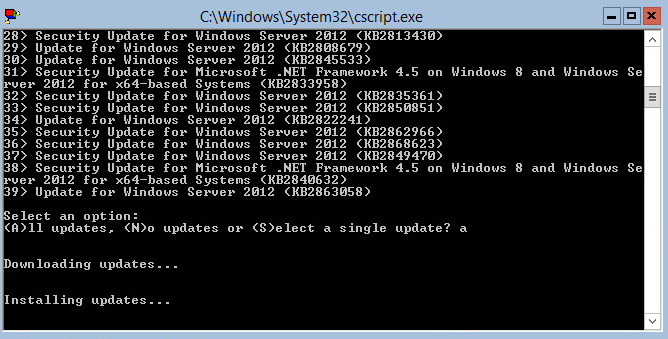
When the search completes, it will list all apllicable updates. You will have the option to select all updates, no updates or a single update to install. We will choose “A” for all updates. The updates will now begin to download and then install as shown below.
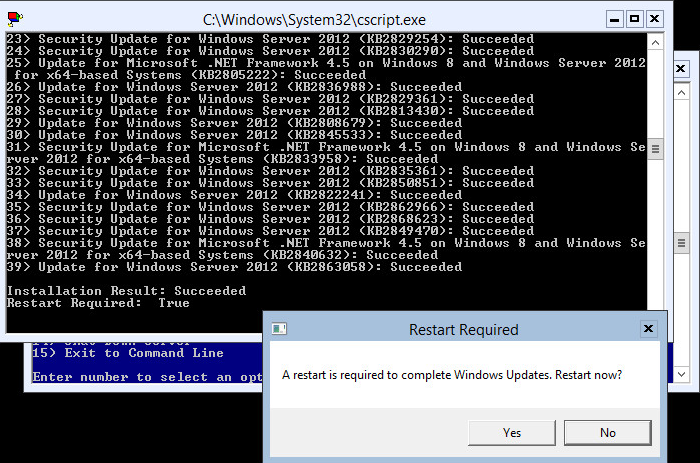
Once the updates are complete, you will receive an Installation result and be prompted to reboot. Click “Yes” to reboot.
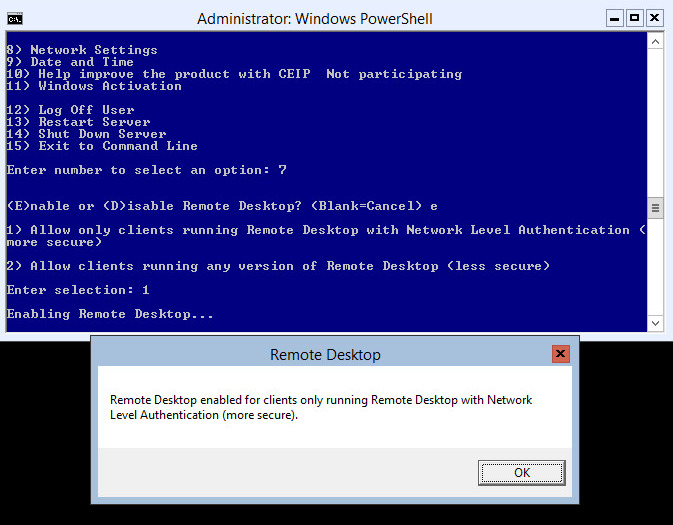
In our next step we will enable Remote Desktop. Choose option 7 to enable Remote Desktop. Type “E” to enable Remote Desktop. Now you have the option to allow clients running any version of remote desktop or only clients running Remote Desktop with Network Level Authentication. In this example we will choose option 1 as shown below. You will receive confirmation of your settings. Click “OK” to return to the “Server Configuration” screen.
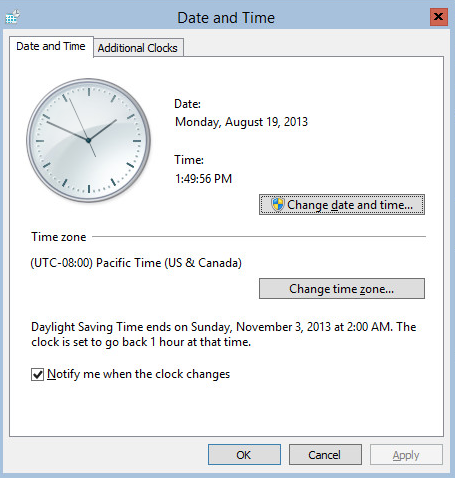
Next we will set the Date and Time. Choose option 9 to set the Date and Time. Once you select this option, a “Date and Time” window will open the same as it would in the GUI. Configure the settings to your needs and click “OK”.
Those are all the settings we will cover in this blog. As you can see from the screenshots you can also activate windows, join the customer experience improvement plan and configure Windows Remote Management which is enabled by default. You can also use sconfig to logoff, shutdown or restart your server. Hope this helps. As always, if you have any questions or feedback, please leave a comment.